
Monday, December 17, 2012
Three Burgundians Before Twelfth Night - Preview
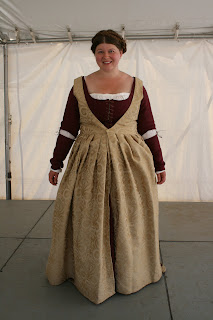
I'm ecstatic to report that I was able to finish the three Burgundian ensembles (one for myself, two for friends) before my self-imposed deadline of December 18th. I'm going to be visiting family for Christmas and New Years, then we're wearing the gowns to Twelfth Night on January 5. More pictures are, of course, to come, but here's a preview photo. It's at an odd angle, as it was taken with the camera self-timer from a stump in my back yard. I'm looking forward to the event. It should be exciting!

Wednesday, November 7, 2012
Yet Another 1480s Florentine dress...
... But this time, I think I finally perfected my pattern!
I've made two other attempts at this style, here, and here.
The first rendition, the blue gown, had some weird issues with the front closure. I learned a lot on that one. The second one, in turquoise, is much better on the front closure issue, but the bodice pattern isn't quite right. It's not as supportive as it needs to be - things creep downwards, and have to be periodically readjusted.
But no longer! May I present the purple gown!

This is my, "Ta da!" pose.
I basically took the bodice pattern from this project, moved the closure to the front, and took it in a good three inches directly under the bust, and inch or so from each seam. There's no way for the bust to creep downward, so everything stays where it's supposed to be. With no boning whatsoever. And, it's more flattering.


The skirt is still a giant rectangle knife pleated to the bodice. And on this gown, all stitches visible to the exterior were sewn by hand. It does develop a crease under the bust after wearing it for a while, but this doesn't bother me terribly.
The sleeves are in two separate pieces. The top portion laces to the shoulder and extends to just above the elbow. This is laced to the bottom portion, which is open along the outside of the arm, and held together with ribbons. This allows for some nice chemise poofs at the elbow and along the back of the forearm.

And here's some photographic proof of my hand stitching:

I also got some pictures in my overgown. Which looks awesome with this dress.

I also had to get a profile picture, like in so many of the period images.

One more...
Thanks to the crazy-talented Daisy Viktoria for taking all these pictures for me.
I've got several projects that I've been working on. I'm making three (count them, three!) Burgundian ensembles before Twelfth Night. Because I am overly ambitious, and perhaps a bit crazy. But seriously, why make one when you can make three? And I'm working on my red silk Eleanor of Toledo gown. Not as quickly as I'd like - I've been out of town too much recently for serious sewing. But I'm getting back to it now. More updates are coming soon!
I've made two other attempts at this style, here, and here.
The first rendition, the blue gown, had some weird issues with the front closure. I learned a lot on that one. The second one, in turquoise, is much better on the front closure issue, but the bodice pattern isn't quite right. It's not as supportive as it needs to be - things creep downwards, and have to be periodically readjusted.
But no longer! May I present the purple gown!

This is my, "Ta da!" pose.
I basically took the bodice pattern from this project, moved the closure to the front, and took it in a good three inches directly under the bust, and inch or so from each seam. There's no way for the bust to creep downward, so everything stays where it's supposed to be. With no boning whatsoever. And, it's more flattering.


The skirt is still a giant rectangle knife pleated to the bodice. And on this gown, all stitches visible to the exterior were sewn by hand. It does develop a crease under the bust after wearing it for a while, but this doesn't bother me terribly.
The sleeves are in two separate pieces. The top portion laces to the shoulder and extends to just above the elbow. This is laced to the bottom portion, which is open along the outside of the arm, and held together with ribbons. This allows for some nice chemise poofs at the elbow and along the back of the forearm.

And here's some photographic proof of my hand stitching:

I also got some pictures in my overgown. Which looks awesome with this dress.

I also had to get a profile picture, like in so many of the period images.

One more...

Thanks to the crazy-talented Daisy Viktoria for taking all these pictures for me.
I've got several projects that I've been working on. I'm making three (count them, three!) Burgundian ensembles before Twelfth Night. Because I am overly ambitious, and perhaps a bit crazy. But seriously, why make one when you can make three? And I'm working on my red silk Eleanor of Toledo gown. Not as quickly as I'd like - I've been out of town too much recently for serious sewing. But I'm getting back to it now. More updates are coming soon!
Friday, September 14, 2012
Going Greek (as it were....)
Highland War is a small war/large camping event that my local group hosts every labor day weekend. In the desert. And it's reeaaaallly reeeeaaaaallllly hot.
So hot that I wasn't able to face the thought of lacing myself into even my coolest linen 15th century dresses.
So, what's a girl to do? Go Greek, of course. It's pre-period, but worth it for these very hot wars. These are very simple ancient Greek dresses. I'm not sure that it even counts as sewing. It's a tube of fabric pinned at the shoulders. They're all made of linen. I also brought a couple of friends, and dressed them up in Greek dresses as well.
Here's Lizzy:

Here's Joella:

And here's me:

Here we are pretending to be Greek statues:

And here we are being Grecian Urns from that one scene in The Music Man:

We also took a normal picture:

I made a second Greek dress for the following day, when sadly, my friends had to go home. This one is handkerchief weight linen, and silk for the top layer. My face is slightly sunburned from the previous day.


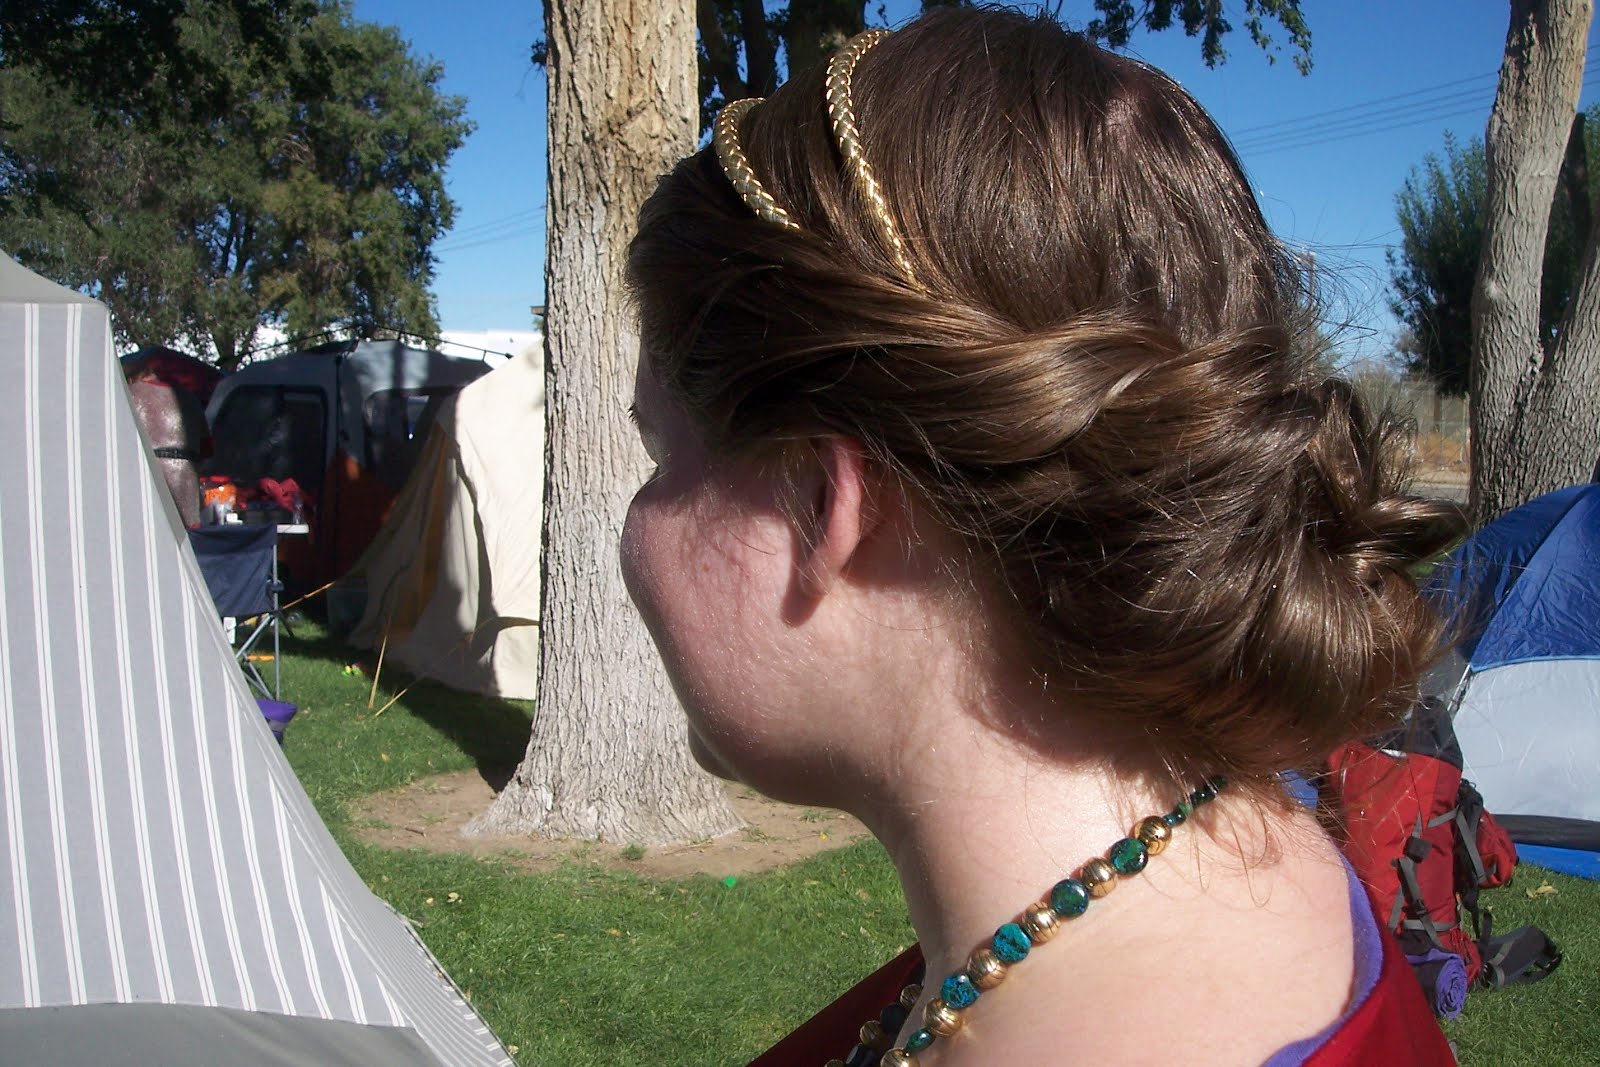
I was really proud of figuring out the hairstyle. I pretty much copied it from a picture of an actual Greek statue.

More actual sewing soon. Also, adventures in shoe making.
So hot that I wasn't able to face the thought of lacing myself into even my coolest linen 15th century dresses.
So, what's a girl to do? Go Greek, of course. It's pre-period, but worth it for these very hot wars. These are very simple ancient Greek dresses. I'm not sure that it even counts as sewing. It's a tube of fabric pinned at the shoulders. They're all made of linen. I also brought a couple of friends, and dressed them up in Greek dresses as well.
Here's Lizzy:

Here's Joella:

And here's me:

Here we are pretending to be Greek statues:

And here we are being Grecian Urns from that one scene in The Music Man:

We also took a normal picture:

I made a second Greek dress for the following day, when sadly, my friends had to go home. This one is handkerchief weight linen, and silk for the top layer. My face is slightly sunburned from the previous day.


I was really proud of figuring out the hairstyle. I pretty much copied it from a picture of an actual Greek statue.
More actual sewing soon. Also, adventures in shoe making.
Thursday, August 2, 2012
It's a Banner!
This probably classifies as more of an embroidery project than a sewing project.
I had a friend offer to teach me how to make a resist-dyed silk banner with my personal arms (as registered with the College of Heralds in the Society for Creative Anachronism, for any non-SCA followers), but our schedules never quite got together. But as the fall camping season approaches, I really wanted to go ahead and get one finished. So, I decided to stitch one together out of what I had laying around.

I registered my device only a few months after joining the SCA. In heraldry-speak, it is:
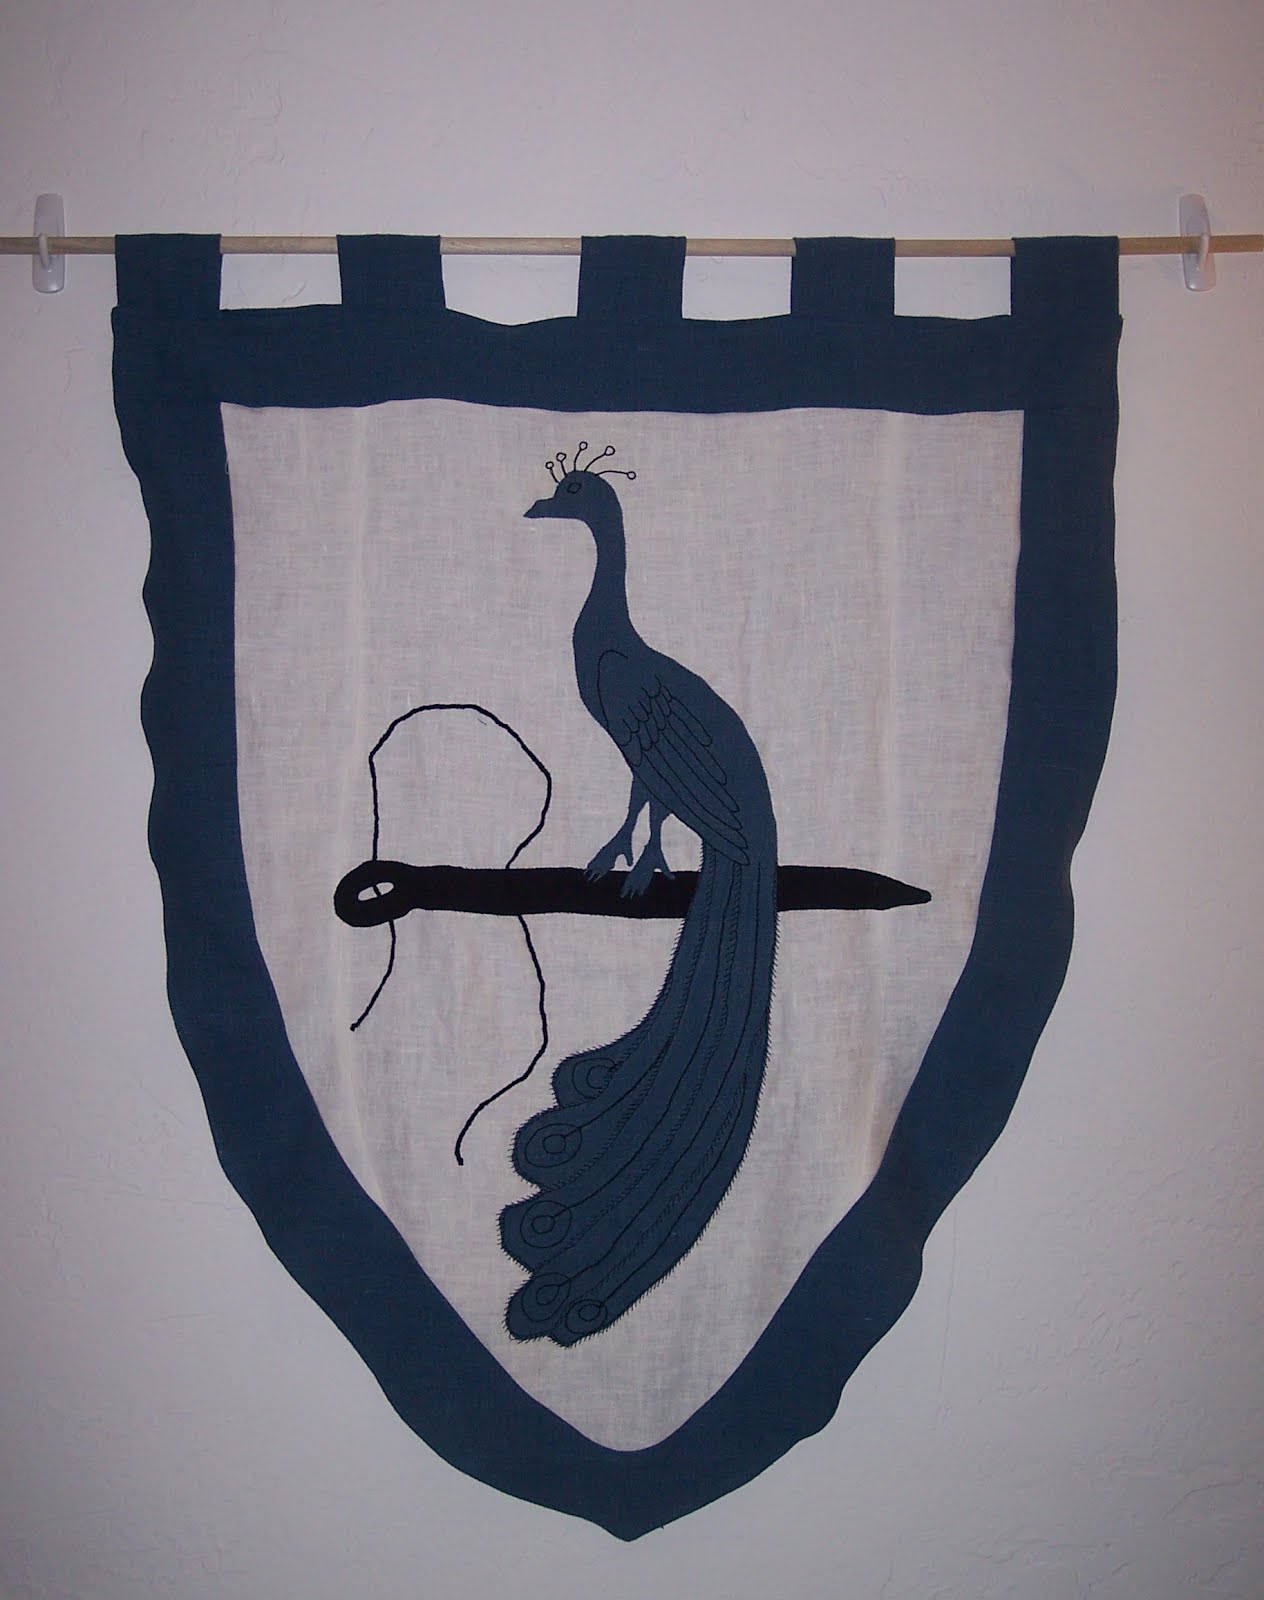
Argent, in pale a peacock azure perched on a threaded needle fesswise point to sinister sable within a bordure azure.
It's made of linen. I appliqued the needle and peacock onto the white background by hand. I basically just folded the edges under and whip stitched it down. Then I stitched the blue border around the white field, and attached the back lining and the top loops by machine. The feet were especially tricky, but I think it turned out well.

All the detail on the peacock is hand embroidered, with black perle cotton that I had laying around.

The wing details, the peacock's eye and crest, and the feather eyes are outlined with a stem stitch.


For the tail feathers, the shaft was outlined with a chain stitch, and the feathers were edged with a singe feather stitch (which seemed appropriate).

For the thread going through the eye of the needle, I simply couched down a braided cord.

Right now I have my banner hanging on the wall of my sewing room, but when I go camping, I plan to display it outside my pavilion. Maybe I'll still make a dyed silk banner some day, but for now, I'm perfectly happy with this one.
I had a friend offer to teach me how to make a resist-dyed silk banner with my personal arms (as registered with the College of Heralds in the Society for Creative Anachronism, for any non-SCA followers), but our schedules never quite got together. But as the fall camping season approaches, I really wanted to go ahead and get one finished. So, I decided to stitch one together out of what I had laying around.
I registered my device only a few months after joining the SCA. In heraldry-speak, it is:
Argent, in pale a peacock azure perched on a threaded needle fesswise point to sinister sable within a bordure azure.
It's made of linen. I appliqued the needle and peacock onto the white background by hand. I basically just folded the edges under and whip stitched it down. Then I stitched the blue border around the white field, and attached the back lining and the top loops by machine. The feet were especially tricky, but I think it turned out well.

All the detail on the peacock is hand embroidered, with black perle cotton that I had laying around.

The wing details, the peacock's eye and crest, and the feather eyes are outlined with a stem stitch.


For the tail feathers, the shaft was outlined with a chain stitch, and the feathers were edged with a singe feather stitch (which seemed appropriate).

For the thread going through the eye of the needle, I simply couched down a braided cord.

Right now I have my banner hanging on the wall of my sewing room, but when I go camping, I plan to display it outside my pavilion. Maybe I'll still make a dyed silk banner some day, but for now, I'm perfectly happy with this one.
Wednesday, July 25, 2012
Tutorial: Boxy Unisex T-shirt to Fitted Women's T-shirt
And Now for Something Completely Different: A tutorial!
I often buy geeky or SCA related t-shirts because I love the design. But I find that I rarely wear them. And that's mostly because of the boxy fit and crew neck. And the sleeves come almost to your elbows. Honestly, unisex t-shirts aren't the most flattering look for anyone with curves.
In an effort to make my t-shirts more wearable, I decided to try to make them more fitted. And, since I actually took pictures of all the steps this time, I'll share the steps.
Here's what I started out with. It's my "Going Hawking" shirt from Gulf War. Apologies for the crappy mirror picture:

Start by laying your t-shirt out flat, with no wrinkles.

To cut the correct armscye and side curve, I used another t-shirt that has the look I'm going for as the pattern. Lay it out flat on top of your boxy t-shirt, and make sure it's centered.

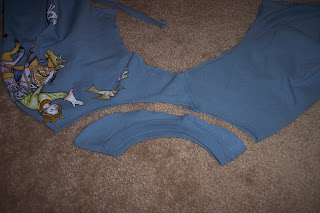
Then, cut it out. At this point, it helps to fold the t-shirt in half and make sure the sides match. Symmetry is a good thing. In addition to the sides, I cut a bit off the bottom, as the original t-shirt was too long.

If you want a tank top, you can stop here and just stitch up the sides. But I wanted to keep the sleeves, just make them smaller. For this, I took the old sleeve and lined it up with the armscye the way I wanted it to look on the final shirt. This also retains the original sleeve hem, so you don't have to re-hem. Then, cut along the armscye.

Next, we need to cut out the neck. It might be helpful to try on the shirt and mark how far down you want it to come. It's good to err on the side of caution. You can always cut the neck bigger, but you can't make it smaller. Fold the shirt so that the shoulders are together, then cut a line from just below the crew neck in the back to the spot you marked in the front. Try it on again. If it's too small, trim it a bit more.

Here's the shirt laid out with it's new neckline and new sleeves. Now we're ready to stitch it together.

Pin the sleeves into the armscye and make sure everything lines up, then stitch them on.

Likewise, pin the sides together, then through the sewing machine.

Here's what we've come up with so far. It's looking much better.

You can stop here if you like. T-Shirt fabric won't unravel much. However, I would like mine to look a bit more finished. I folded the hem over twice, and stitched it down. I was afraid the neckline would look funny with the fold-and-stitch method, so I unpicked the hem from the bit I cut from the bottom of the original t-shirt and made some "bias tape" with it (though of course it's not cut on the bias). I pinned this around the neckline and stitched it down.

And here's what we ended up with. A fitted t-shirt that looks finished, that I'm more likely to actually wear. Again, apologies for the mirror picture.

Detail shot!

I often buy geeky or SCA related t-shirts because I love the design. But I find that I rarely wear them. And that's mostly because of the boxy fit and crew neck. And the sleeves come almost to your elbows. Honestly, unisex t-shirts aren't the most flattering look for anyone with curves.
In an effort to make my t-shirts more wearable, I decided to try to make them more fitted. And, since I actually took pictures of all the steps this time, I'll share the steps.
Here's what I started out with. It's my "Going Hawking" shirt from Gulf War. Apologies for the crappy mirror picture:

Start by laying your t-shirt out flat, with no wrinkles.

To cut the correct armscye and side curve, I used another t-shirt that has the look I'm going for as the pattern. Lay it out flat on top of your boxy t-shirt, and make sure it's centered.

Then, cut it out. At this point, it helps to fold the t-shirt in half and make sure the sides match. Symmetry is a good thing. In addition to the sides, I cut a bit off the bottom, as the original t-shirt was too long.

If you want a tank top, you can stop here and just stitch up the sides. But I wanted to keep the sleeves, just make them smaller. For this, I took the old sleeve and lined it up with the armscye the way I wanted it to look on the final shirt. This also retains the original sleeve hem, so you don't have to re-hem. Then, cut along the armscye.

Next, we need to cut out the neck. It might be helpful to try on the shirt and mark how far down you want it to come. It's good to err on the side of caution. You can always cut the neck bigger, but you can't make it smaller. Fold the shirt so that the shoulders are together, then cut a line from just below the crew neck in the back to the spot you marked in the front. Try it on again. If it's too small, trim it a bit more.


Here's the shirt laid out with it's new neckline and new sleeves. Now we're ready to stitch it together.

Pin the sleeves into the armscye and make sure everything lines up, then stitch them on.

Likewise, pin the sides together, then through the sewing machine.

Here's what we've come up with so far. It's looking much better.

You can stop here if you like. T-Shirt fabric won't unravel much. However, I would like mine to look a bit more finished. I folded the hem over twice, and stitched it down. I was afraid the neckline would look funny with the fold-and-stitch method, so I unpicked the hem from the bit I cut from the bottom of the original t-shirt and made some "bias tape" with it (though of course it's not cut on the bias). I pinned this around the neckline and stitched it down.

And here's what we ended up with. A fitted t-shirt that looks finished, that I'm more likely to actually wear. Again, apologies for the mirror picture.

Detail shot!

Saturday, July 14, 2012
16th Century Persian
I actually made this a little less than a year ago, but never got any pictures.
Today's event was hot enough that I decided to break the Persian out again. It's based on a number of Persian miniatures from the 16th century.


It is made completely from thin cotton quilting fabric. It consists of a pair of striped pants (hurray for pants!), and two tunics, worn one over the other. I've lined only the front lower portion of the top tunic in yellow, so I could turn the front back the show the lining.

The tunics are patterned almost exactly like t-tunics. I did take them in along the side of the torso slightly, to make them more fitted and less boxy. The bottom tunic is closed with buttons, and the second tunics use a button with a frog and loop system, similar to these.

I'm wearing a white linen headband which ties in the back of my head, with two veils pinned to it - the first is short and in copper silk, and a second is longer and in sheer green silk. Hopefully you can tell how the veil layers look in the picture below. Lots of information on Persian veils along with great examples from miniatures can be found on this excellent website.

I love this ensemble. It's a fun change from the 16th century Italian stuff I normally wear to events. It's relatively cool, and you get to wear pants while remaining historically accurate. And I love that I get to stay in my time period (16th century) while just moving over a few countries.
Saturday, June 23, 2012
1520s Florentine Tourney Dress
Since I've made a couple of front lacing gowns, I wanted to try my hand at making one that laces on the side. And since I needed new Tourney dresses (which should be easily washable), I decided to make it out of cotton sateen. In my brain I imagined that it would look more like silk. But I had forgot that cotton sateen is what they often make sheets out of. But it doesn't look like it's made from sheet, thankfully...
I drew inspiration from the collection of images on Festive Attyre. Particularly these images. I like the flat front, the high waist, and the awesome sleeves. And two images portray turbans - I was fascinated by the Florentine turban trend, so I decided my dress must include a striped one.


I finally broke down and attended a costuming gathering down in Long Beach, where one of my Kingdom's costuming Laurels helped me with the bodice pattern. It is AMAZING!!! Drafting patterns on yourself is very difficult, if not impossible. Having some help, especially someone so knowledgeable and talented, makes all the difference in the world.


The rest of the gown is pretty standard. The skirt is a giant rectangle, knife pleated to the bodice. It laces in the side. I trimmed the neckline and hem with some brown linen. It also has a brown linen sash at the waist.
One thing that doesn't show up in the picture is how awesome the sleeves are. They're rather large round sleeves, navy on one side, and maroon on the other. They're attached at only one lacing point, at the top of the shoulder, so the chemise can peak out as it does in the original paintings. Here they are as they were being cut out. The width at the widest point is about the same as the length.

The turban is just a long strip of striped cotton fabric about a foot wide. I attempted to replicate the turban wrapping method demonstrated at The Purple Files. I was very pleased with how it turned out.
Bonus picture: Here I am enjoying my new Dantesca chair, which I purchased at Gulf Wars for far too much money. But it's perfect, and exactly what I wanted. And the most comfortable wooden chair I've ever sat in.

Subscribe to:
Posts (Atom)