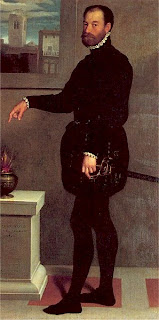
These two are the closest to the idea I was going for. All black, from head to toe, from 1560s-1570s Venice. Most of the portraits were found on the ever-amazing Realm of Venus. These three are from very close to the same time and place, but show a little more detail, as they're in lighter colors.
And these three are from slightly different times and places (though they're all still mid-late 16th century Europe), but show how prolific the men-in-black fad was.

My attempt was made of black silk, interlined with a thin, non-stretch cotton, and lined with black linen. The doublet is fairly simple in construction - it's made in three pieces, with two side-back seams, and a closure in the front. It has a short stand-up collar at the neck (I'm not sure that I got the shape entirely right - I need to play with that), once piece shoulder wings, and three longish waist tabs. The front is closed with 15 hand-wrapped buttons.
I especially wanted to do trunkhose with this ensemble rather than Venetians or pants. It seems that lots of SCA guys wear doublets, but few wear trunkhose. They ended up being far more difficult and time consuming than I had imagined.
The construction is based on a variety of extant trunkhose from Janet Arnold's invaluable Patterns of Fashion 3. They're constructed in three parts. First, there is a lining, shaped basically like a modern pair of shorts. Second, there is the middle layer, which is about twice as big around and 4-3 inched longer than the lining layer. The top layer are the panes. Separate, finished strips of fabric were laid down in the same shape as the middle layer. My panes were made of silk, and lined in linen, both black. The middle layer is made of linen as well. The original hope was that the light would play differently on the different textures, although they were all the same color, and make the silk panes stand out against the linen middle layer. Unfortunately, this doesn't seem to happen. They all kind of blend together, and it's difficult to tell that panes are there at all. Which makes me sad, as I put a lot of work into them, and they took forever.
For construction, the lining is stitched to the waistband and to the leg bands. The middle layer, with the outer layer of panes basted in place along the top, are cartridge pleated to the waistband. Each leg has about 16 little "triangles" sewn into them to create the puffy "pumpkin" look, and are whip stitched to the leg bands. The bottom of the panes were then slightly gathered and whip stitched to the leg bands over the middle layer. This blog and this blog were both very helpful in figuring out the construction method for the trunkhose - they were quite a mystery when I started this project.
I decided to fore go the codpiece - partly because I didn't want to go there, but mostly because I ran out of time. And there were of couple of trunkhose in Arnold that didn't have one at all. So it's document-able. And I am okay with that. The lower hose are made of black t-shirt knit. Which is not at all period, but was suggested by an SCAer in Caid who is known for his awesome 16th century garb. After talking with him, I though I understood that he gartered his hose just above the knee. This didn't work for Andrew - they kept slipping down. So he eventually just stitched them to the leg bands of the trunkhose. If I make another pair, I'll make them longer, and point them at the waist, underneath the trunkhose, which I understand is closer to the period solution.
The sleeves were very last minute. I made them last thing the night before the event, and sewed the ribbons to attach them to the doublet in the car on the way. I only made one attachment point for each sleeve, but that didn't work well - the shirt showed too much, especially at the back. I plan to add another 2-3 attachment points per sleeve. Another problem was that the trunkhose had trouble staying up at the correct level, and there was sometimes shirt showing between the trunkhose and doublet. This was not helped by the fact that the trunkhose were really heavy - Too many layers involved. In period, the two were pointed together, but I had heard other costumers talk about how much trouble this was. Another costumer I spoke to at the event suggested either suspenders (the non-period, but very workable solution) or hooks and eyes at strategic points (the semi-period, but still workable solution). I'll probably sew on at least a few hooks and eyes attaching the doublet to the trunkhose. At least one in center back, and one on each side.
I also finally got the chance to wear my blue silk Venetian to this event - 12th Night in Caid. It was lots of fun, and I'm happy to report that both ensembles made it through the whole day, including the feast and dancing, with no major mishaps. More pictures of the blue silk Venetian to come soon, I hope.


