Friday, October 15, 2010

A Cloak Quandary

After my most recent SCA event, I have discovered that I want a cloak. Evenings can get cool. Especially when wearing boat-necked cotehardies with all your hair up and nothing on your shoulders.

However, upon mentioning this to a fellow garb enthusiast who's been in SCA longer than I, she went on a bit of a rant about how the cloaks people wear are not historically accurate. And she's right, for the most part. Most people who I've noticed in the SCA wear full circle, ankle length, deeply hooded cloaks. And these are certainly not from the period SCA covers. They were used in more recent times. Probably from 1700s to as recently as late Victorian and Edwardian times. These cloaks give a very romantic silhouette. They're very fun, but not period. Here's an example of one from an Etsy vendor advertised as "perfect for SCA".


So, I have begun researching period cloaks. My persona seems to be developing in the direction of the 14th century, so I was mostly researching cloaks from that period and before. From what little research I've done so far, there seem to be two styles: the Brat, and the half-circle cloak. There's also a shoulder-fastening cloak that might be 3/4 circle, but that seems to be worn only by men, so I won't be discussing it here.

Brats are very simple in design; a large rectangle, of varying lengths, perhaps lined and decorated or trimmed, is pinned either at the throat, or over the right shoulder. They're simple and versatile, and double as a blanket. They're mentioned as being worn by Vikings, Anglo-Saxons, and Gaelic cultures. I have no doubt that they would continue to be worn for several centuries after that, perhaps by lower classes. It seems to be such a basic and practical garment that it would have held on for a while.

Next comes the half-circle cloak. In the little bit of research I've done so far, I've noticed these depicted in a number of paintings and statuary from the 12th century to the early 16th. For example:


However, I've heard that half-circle cloaks are a bear to wear. Especially if you try to fasten them with a cord across your neck. I've hear reported that they inevitably fall back and the cord chokes you. I've heard other people say that these cloaks were probably more for decoration than keeping you warm; a garment accessory rather than a necessity for cold weather. This makes sense as well. Most of the cloaks pictured in paintings were a bright color, and lined with a contrasting color. The cloaks drape gracefully behind the wearer; they're not huddled into them. Some paintings even depict heraldic cloaks.

So perhaps these half-circle cloaks were primarily decorative. Maybe they even continued to wear brats for cold weather, and they were simply not depicted in paintings. People huddled up running through the rain was perhaps not a favorite subject of period painters.

I did find one page on cloak construction that might make half-circle cloak a bit easier to wear. They suggest sewing two darts in the neck of the cloak to create a "shoulder" in the cloak, hopefully helping the cloak stay on the wearer's shoulders (http://www.feoragdubh.eastkingdom.org/Nutshell_2004-01/nab_cloaks.htm). I've also heard people suggest that you fasten the cloak further down than people normally think, across the chest rather than just under the neck. This supposedly prevents choking.

Another option I'm going to look into is making a hood, rather than a cloak, to keep warm on chilly evenings. Hoods are well documented in this period for both men and women.


I'm seriously digging the liripipes.

A closed hood, on the woman bent over, harvesting grain.

King Solomon, with the two ladies to the left wearing open hoods.

Putting buttons down the front also gives the option of wearing hoods open, allowing you to better control your temperature without taking the hood on and off. Some of these hoods are short, others fall over the shoulders. Also, liripipes are quite stylish.

I'm not sure where this leaves me. I bought several yards of dark grey/black wool last weekend with the intention of making a cloak. I will definitely not be making a full circle, deeply hooded cloak (though they do look nifty...). I will probably attempt to make a half-circle cloak with shoulder darts. I will probably also make a hood with buttons down the front. After looking at so many pictures, I wish I had bought wool in a color other than almost black, as most of these illustration depict brighter colors. I'll post some pictures of my finished items as soon as I decide what I want to do and make them.

Monday, October 11, 2010

Red Cotehardie with Brocade Sideless Surcote

I returned yesterday from Highland War (obviously victorious, from the amount of loot I brought back with me). But I didn't get a chance to post pictures of one of my projects before I left.

I wanted to make a second cotehardie, as they are both comfortable and flattering. I had about 5 yards of red linen for that purpose. But I didn't have enough time to make any additional fabric covered buttons, so I had to settle for metal ones. The pattern used was the same as for my previous cotehardie, adapted from the Elizabethan Smock Pattern Generator. I took a little more care in sewing this one together, and actually used my iron. I even attempted to finish the seams (though using a serger would have been much quicker. Maybe one of these days I'll be able to get one...). I think it's evident that the dressmaking skills on this one are improved. Ironing seams while sewing really do make a big difference.


I also made a sideless surcote to wear over it. I used the pattern/guidelines created by Lady Jehanne de Wodeford, who I actually met at Great Western - I recognized the heraldry on her tent from her website, and went over to introduce myself (http://www.wodefordhall.com/surcote.htm).

Most sideless surcotes from the paintings are either made of one solid color, or made with a fur plastron and a fabric skirt, such as the lady in this picture:


As fur is both hot and expensive, I decided to use a brocade for the plastron and at the hem, and go for a less ornate, plain brown at the skirt. I thought it turned out relatively well.


I didn't get any pictures of myself in this garb at Great Western, as it was pretty much dark by the time I remembered to grab my camera, but here's a Garb In Action picture of me wearing my brown and white cotehardie with a barbette and fillet.


As a bonus picture, here's my new mini-pavilion, all thanks to some very very generous people who live in my shire.


I think I'm going to take a slight break to help some friends with Halloween costumes, then work on an Elizabethan doublet.

Sunday, September 19, 2010

14th Century Cotehardie with Tippets

I seem to spend the vast majority of my time working on projects that, while amazing, are very ornate, heavy, and hot. I couple of weekends ago, I attended my first SCA event: Highland War. The temperature was over 100 degrees each day. Because of the heat, I didn't even bother taking my Elizabethan dress. And as I don't have much garb yet, I've decided to put future Elizabethan projects on hold until it's cooler, and concentrate on getting an SCA wardrobe put together.

This project began with some beautiful patterned brown and white fabric. I had originally thought to make something resembling a bliaut from it, but once I began researching 12th century fashion, it seems that patterned fabrics were not used. Plus, it looks like most bliauts were made of finer fabrics, like silk, while this is a fairly heavy cotton. So, I turned to the 14th century, and began researching cotehardies.

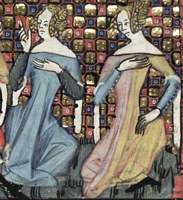
I ran across a site with a number of illuminations from a period book, the Romance of Alexander. The cotehardies depicted here were exactly what I was looking for. And, they use patterned fabrics.


I ended up making the under-cotehardie, of which you can see only the sleeves when it's all put together, out of a lightweight blue cotton I found for about $2/yard. I's not a period fabric, but it's very light and cool. I actually wore this by itself to Highland War, before the buttons were put in, as I was rather short of garb, and as I didn't have the overdress made yet. It's based basically on the pattern I used for my Elizabethan smock. I shortened the gores slightly to get a more fitted look through the torso, and lengthened the whole thing quite a bit.


The overdress is made from the brown and white patterned fabric. The sleeves are about elbow length. It's made from the same pattern as the under-dress, except in this one, I made the front and back gores shorter, as I thought it looked funny on the under-dress. If I make any more in this style, I'll probably make the side and back gores come to my waist, and shorten only the front one. I made the tippets detachable - they attach at the arm just about at my elbow with hooks and eyes. I know hanging sleeves can get annoying, so I wanted to make myself an out. They're lined with white cotton muslin.


Additionally, I made my own buttons! I had originally wanted to buy some cheep plastic buttons and cover them with fabric. However, I ran into another costumer's research regarding period buttons from a dress found in a bog. These buttons consisted of fabric covering either wool stiffened with glue, or wooden plugs. As glue stiffened wool sounded like a lot of trouble, I went to the hardware store and bought a bunch of 3/8 inch, mushroom-shaped wooden plugs. They're very cheep - I got 25 for less than $2. I then cut a circle large enough to cover the button with a bit of a tail left over from the same fabric as the dress, and a smaller circle from some leftover denim big enough to cover only the top of the button.


I then stitched the smaller circle to the back of the larger circle with five or six stitches, then stitched around the outside of the larger circle. The wooden plug goes in the middle, the outside stitches are gathered, then wrap some thread around the tail, secure, and knot. Voila! A homemade button. Before I sewed them to the dress, I put some fray-check around the edges of the tail so I wouldn't be shedding little threads through the life of the garment.


I think they look very nice. I did machine-stitch the buttonholes, as I have not yet taught myself to do them by hand. Plus, after making about 40 buttons, I was getting impatient to finish the dress. The buttons are a little fatter than most buttons I work with, which can make getting them through the buttonholes difficult. But all in all, I'm very pleased with them. Here's a close-up:


And here's how the whole thing goes together. I apologize for the mirror-picture - I didn't have anyone around to take a picture at the time, and I utterly fail at getting good pictures using the camera's self-timer.


All in all, I'm very pleased with this project. When I wear it to an event, I'll braid my hair in two braids, and pin them to the side of my head like in the 14th century illuminations. The style does tend to attract Princess Leia comments, but who do you think she stole the hairstyle from? :-P